Votifier receives notifications when someone votes for your server on a voting website. You'll also need a vote listener plugin to turn those notifications into rewards. This guide covers the Votifier receiver, including azuvotifier and NuVotifier builds.
Let the panel set up the receiver
- Take a backup and stop your Minecraft server. Open Plugins, or Mods for a supported mod build.
- Keep Versions on Current version. Search for the receiver you want, such as azuvotifier or NuVotifier, and select a compatible release. Only install one receiver on the same server.
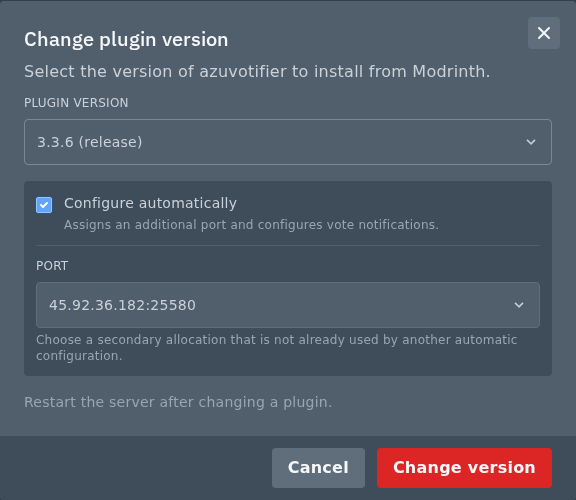
- When Configure automatically is offered, leave it ticked. Choose Assign a new port or an unused secondary allocation under Port. This must be separate from the Minecraft game port and other plugins.
- Click Install plugin or Install mod, then start the server. The panel sets the receiver's host and port. Supported token-based builds also get a token if one hasn't already been configured.
If the download or automatic option isn't offered, upload it yourself using the steps below. The Change version icon on a tracked installation also lets you reopen the port options.
Install and configure it manually
- Download a build for your server from azuvotifier or NuVotifier. Stop the server, then open Files in the panel and open
plugins. Drag the JAR into File Manager, or use SFTP to upload it to the same folder. A Fabric mod belongs inmodsinstead. - Start the server once to generate its configuration, then stop it. Open Network and create an extra allocation in Network for vote notifications.
- Open the receiver's config in Files. On Bukkit, Spigot or Paper, this is normally
plugins/Votifier/config.yml. Other builds use the paths in the table below. - Set the host to
0.0.0.0and the port to your extra allocation. For a YAML config, the lines look like thishost: 0.0.0.0 port: 25580
For a TOML or HOCON config, keep that file's existing syntax, such as
host = "0.0.0.0"andport = 25580. Save and start the server.
| Build | Config path |
|---|---|
| Velocity NuVotifier | plugins/nuvotifier/config.toml |
| Waterfall / BungeeCord NuVotifier | plugins/NuVotifier/config.yml |
| Sponge NuVotifier | config/nuvotifier/config.yml |
| NuVotifier-Fabric | config/NuVotifier/nuvotifier.yml |
| azuvotifier mod | config/azuvotifier/settings.conf |
Connect your voting website
In the voting website's Votifier settings, enter the server's public IP and the extra port you assigned to the receiver. Use the token from your config if the website supports the token protocol. For legacy Votifier, supply the contents of rsa/public.key from its data folder. Keep private.key and your tokens private.
Send a test vote using the voting website's test button and check the Minecraft console. A received vote with no reward means you still need to configure your vote listener. Installing Votifier alone doesn't create reward commands.
