Note: To implement dynamic configurations, your server must be operating on a Windows operating system. If your service is currently on Linux then please submit a support ticket for us to migrate you, subject to availability.
The dynamic configuration feature in ARK provides you with the flexibility to adjust certain server settings without the need to restart your ARK server, making it particularly convenient for hosting weekend events or making quick adjustments
To set up dynamic configurations, follow these steps:
-
Backup Your Server
-
Before proceeding, it's always a good practice to stop your server and create a backup in case anything goes badly.
-
-
Access command line Manager
-
Navigate to your server panel.
-
Locate and click on the command line Manager option.
-
-
Create or Edit an existing Custom Command Line
- If you do not already have a custom command line, click on new to create one.
- Select the custom command line you just created and click edit.
-
Enable Dynamic Config
- Tick the boxes next to Enable Dynamic Config and Dynamic Config URL.
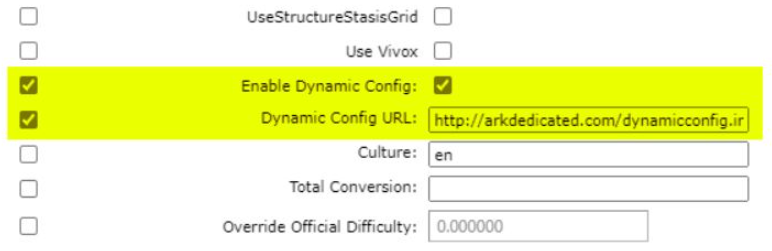
- Specify Dynamic Config URL
- In the Dynamic Config URL box, provide a link to the .ini file you wish to use. This file must be hosted on a website. If you don't have a website for your server, consider exploring our Web Hosting plans!
- Configure Server Settings
- Your dynamic config .ini file can include adjustments for various server settings, including but not limited to:
TamingSpeedMultiplierHarvestAmountMultiplierXPMultiplierMatingIntervalMultiplierBabyMatureSpeedMultiplierEggHatchSpeedMultiplierBabyFoodConsumptionSpeedMultiplierCropGrowthSpeedMultiplierMatingSpeedMultiplierBabyCuddleIntervalMultiplierBabyImprintAmountMultiplierCustomRecipeEffectivenessMultiplierTributeItemExpirationSecondsTributeDinoExpirationSecondsEnableFullDumpGUseServerNetSpeedCheckbUseAlarmNotificationsHexagonRewardMultiplierNPCReplacements
- Your dynamic config .ini file can include adjustments for various server settings, including but not limited to:
- Save and Activate
- After editing your command line, remember to click the save button.
- Then, click select to activate the custom command line.
- Activate Settings
- At any time, you can activate the configured settings on your server by navigating to the actions tab on your server's panel and utilizing the
[Force Dynamic Config Update]button.
- At any time, you can activate the configured settings on your server by navigating to the actions tab on your server's panel and utilizing the
With these steps, you'll have dynamic configurations set up and ready to enhance your ARK Game Server experience without the hassle of server restarts.