Sometimes when hosting a Minecraft server, you may need to open a port for certain mods like SimpleVoiceChat or plugins like Dynmap. Opening a port allows the mod or plugin to communicate on that port. You can do this from your Multicraft panel.
If you are self-hosting your Minecraft server, follow the advanced guide at the bottom of this article.
Part A: Opening a port with Multicraft (LogicServers)
Step 1: Open your server on Multicraft
Head to https://multicraft.logicservers.com/ and log in using your credentials.
If you don’t yet have a server, you can get one here: https://logicservers.com/game-servers/minecraft
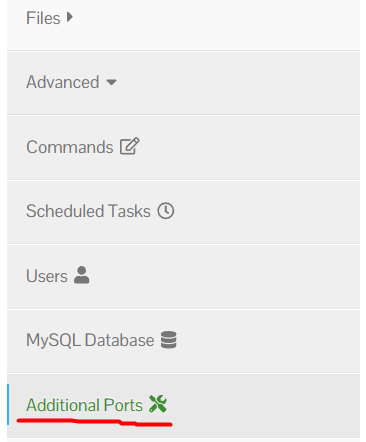
Step 2: Locate the Additional Ports section
On the left-hand side menu, click Advanced to expand the options, then select Additional Ports.
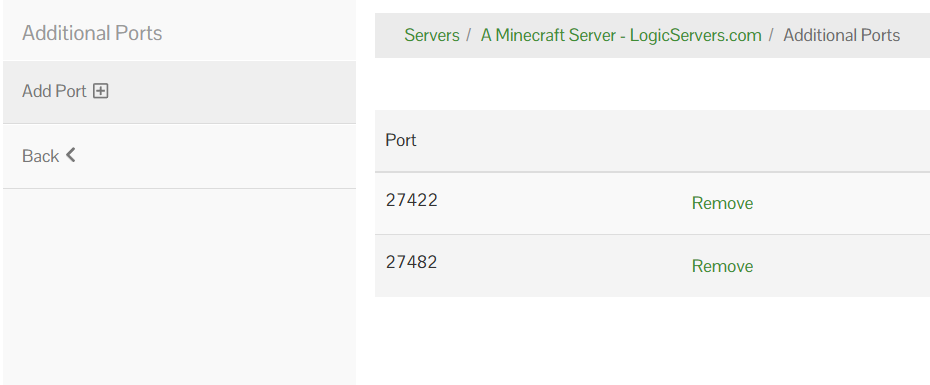
Step 3: Add a port
- Click the Add Port button in the side menu.
- A new port number will be displayed, which you can now use.
- You can repeat this to open additional ports.
- If you no longer need a port, you can remove it by clicking Delete.
Step 4: Configure the plugin or mod
Open the configuration file for your plugin or mod and set the port number to match the one you just opened in Multicraft. Your setup is now ready to go.
Part B: Opening a port manually (self-hosted servers)
If you’re hosting the Minecraft server yourself, follow the steps below to forward a port through your router and firewall.
Step 1: Find your local IP address
On Windows:
- Open the Start menu and type
cmdto launch Command Prompt. - Type
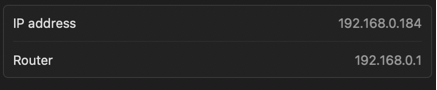
ipconfigand press Enter. - Look for the “IPv4 Address” under your network adapter. It will look something like
192.168.x.x.

On Mac:
- Open System Preferences and go to Network.
- Select your active connection (Wi-Fi or Ethernet) and click Details.
- Scroll down to the bottom, you’ll see your local IP address.
Step 2: Log in to your router
- Open a browser and enter your router’s IP address. This is usually
192.168.0.1or192.168.1.1. - Log in with your router admin credentials. If you’re unsure, check the bottom of your router for default login details.
Step 3: Find the port forwarding section
- Look for Port Forwarding, Virtual Server, or NAT Forwarding in the settings menu.
- This is often found under the router’s Advanced settings.
Step 4: Add a port forward rule
In the port forwarding section, add a new rule with the following details:
- Service Name: Minecraft (or any custom label)
- Port Range:
25565 - Local IP: The IP address you found in Step 1
- Protocol: TCP or Both (TCP/UDP)
- External Port:
25565 - Internal Port:
25565
Step 5: Save your settings
Apply or save your changes. Your router may restart after saving.
Step 6: Allow the port through your firewall
Note that the Minecraft Server application will usually automatically open this port for you.
On Windows:
- Open the Start menu and search for Windows Defender Firewall.
- Click Advanced Settings in the sidebar.
- Under Inbound Rules, click New Rule.
- Select Port, choose TCP, and enter
25565. - Allow the connection and name the rule “Minecraft Server”.
On Mac:
- Go to System Preferences > Security & Privacy > Firewall > Firewall Options.
- Ensure that the Minecraft Server application is allowed through the firewall.
Step 7: Test the port
Visit CanYouSeeMe.org, enter 25565, and click Check Port. If it says the port is open, your server is ready for external connections.